Ultimate Guide to Optimize Images for SEO and Maximize Your Web Speed

If there's one technical factor that separates professional websites from amateur ones, it's image management. We often focus on writing the best text or getting links, but forget that a single poorly optimized image can destroy loading speed and, therefore, your Google ranking.
In this guide we'll dive deep into technical image optimization with verified data from Google, continuously updated. We won't stay on the surface; we'll see exactly how to reduce the weight of your visual files by up to 80% without sacrificing quality and how to structure data so search engines understand and reward your content.
Why image weight dictates your Google success
Since the implementation of Core Web Vitals in 2020, Google no longer just reads your text; it measures your user's real experience. The LCP (Largest Contentful Paint) is the official metric that determines how long it takes for the largest visible element of your web to appear.
Official Google data: On 90% of websites, that LCP element is an image. If your LCP exceeds 2.5 seconds, you're in the red zone.
The real impact of heavy images
According to data from the Chrome User Experience Report (CrUX), unoptimized images are the main bottleneck of web performance:
- A 2 MB image can take 4-6 seconds to load on 3G
- 53% of users abandon sites that take more than 3 seconds
- Each second of delay reduces conversions by 7-20% (Google Retail 2024 studies and classic Amazon study)
If you upload a photograph directly from your camera or image bank, you're forcing the user's browser to download unnecessary data. This translates to bounce: the user gets tired of waiting and goes to the competition. Optimizing is not an option, it's a necessity for digital survival.
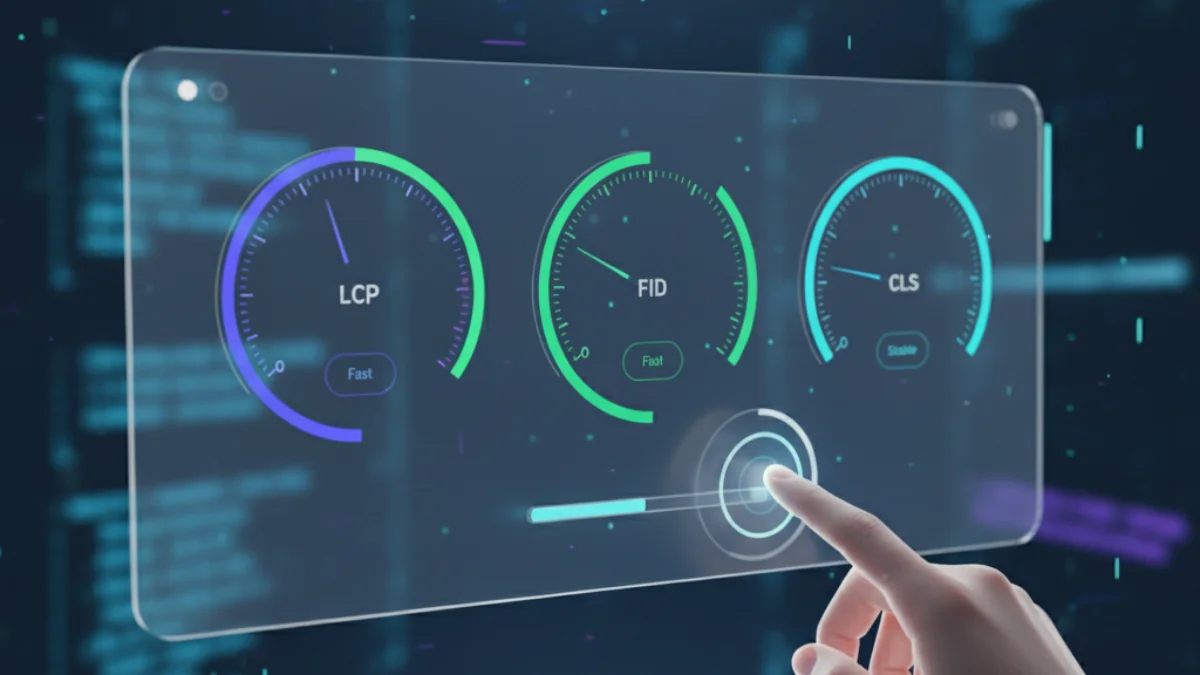
Core Web Vitals: Google's new standard
Google established three mandatory metrics that determine your ranking:
1. LCP (Largest Contentful Paint)
- What it measures: Time until main content is visible
- Good: < 2.5 seconds
- Needs improvement: 2.5-4 seconds
- Poor: > 4 seconds
2. FID / INP (First Input Delay / Interaction to Next Paint)
- What it measures: Response time to user interactions
- Good: < 100 ms (FID) / < 200 ms (INP)
3. CLS (Cumulative Layout Shift)
- What it measures: Visual stability (elements that move unexpectedly)
- Good: < 0.1
- Critical for images: ALWAYS specify
widthandheight
CLS and images: If you don't define dimensions, the browser doesn't know how much space to reserve. When the image loads, it pushes content down → CLS spike → bad score.
The three pillars of modern optimization
According to Google web.dev, effective image optimization rests on three pillars:
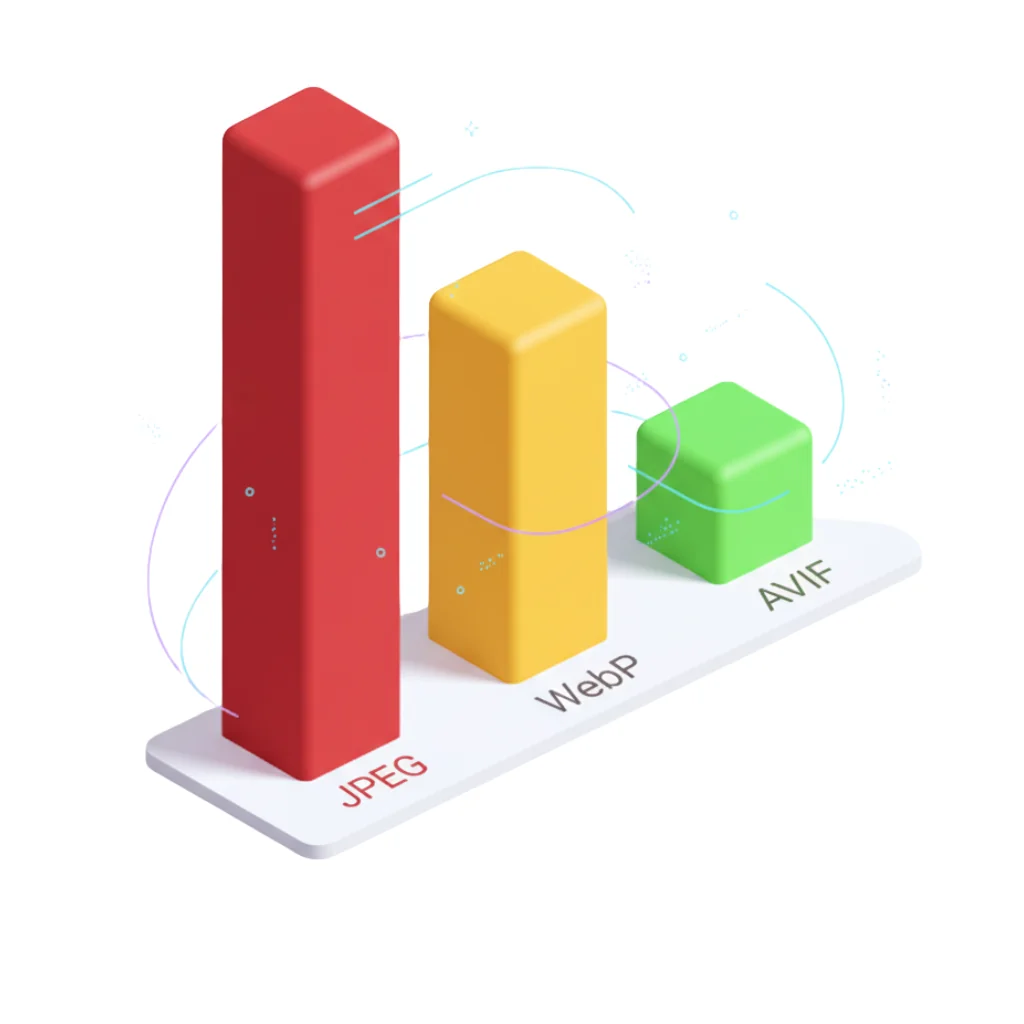
1. Modern format (WebP/AVIF)
Replaces JPEG/PNG. 25-50% size savings with identical quality.
2. Appropriate compression (quality 80-85%)
Balance between quality and weight. Below 80% visible artifacts appear. Above 90% negligible improvement.
3. Exact dimensions
Never upload images larger than they'll be displayed. Waste of bandwidth and slow LCP.
The format dilemma: JPEG vs PNG vs WebP vs AVIF
Not all image formats are equal. Choosing the wrong one can multiply your file size 5-10x unnecessarily.
Formats officially supported by Google Images
According to official Google Search Central documentation:
- BMP (uncompressed, obsolete)
- GIF (animations, limited 256 color palette)
- JPEG (photos, lossy compression)
- PNG (graphics, lossless compression)
- WebP (recommended, superior compression)
- SVG (scalable vectors)
- AVIF (latest generation, maximum compression)
WebP: The current standard
The WebP format, developed by Google in 2010, allows identical visual quality to JPEG but weighing 25-35% less (official Google data). Additionally, it supports transparency, making it superior to PNG for most web uses.
Current compatibility: 97% of browsers support WebP (Chrome, Firefox, Edge, Safari 14+). Safari added full support since macOS Big Sur.

As you see in the graph above, the weight difference is drastic. If your web has 10 images, that savings multiplies, making your page load in milliseconds instead of seconds.
AVIF: The future of compression
AVIF (AV1 Image File Format) is the latest generation format based on the AV1 video codec. Reduces size by 50% compared to JPEG while maintaining the same visual quality.
AVIF advantages:
- 50% superior compression to JPEG
- Supports HDR (High Dynamic Range) and 10/12-bit color
- Transparency (alpha channel)
- Animations (replaces GIFs)
Disadvantage: Slower processing (CPU intensive). Compatibility: Chrome 85+, Firefox 93+, Safari 16.0+ (improved AVIF support in 16.4).
Current recommendation: Use WebP as standard, AVIF for critical hero images with WebP fallback.
Intelligent compression: The science of the sweet spot
There's a myth that compressing an image makes it look blurry or pixelated. This only happens if not done correctly. Modern compression removes information the human eye cannot perceive.
The sweet spot: 80-85% quality
According to Google PageSpeed Insights research, the optimal compression range is between 80-85% quality. In this range:
- File weight drops 50-70%
- Sharpness remains intact for any screen
- Includes Retina displays (high pixel density)
Technical data: WebP compression with 85% quality produces files with Peak Signal-to-Noise Ratio (PSNR) above 40 dB, imperceptible to the human eye.
The rule of exact dimensions
Never upload an image larger than it will be displayed. This is one of the most common Lighthouse audits.
Practical example:
- Container width: 800px
- Uploaded image: 4000px
- Waste: 96% of downloaded pixels are never shown
Solution: Use <img> with srcset for responsive images:
<img
  src="hero-800w.webp"
  srcset="hero-400w.webp 400w, hero-800w.webp 800w, hero-1200w.webp 1200w"
  sizes="(max-width: 600px) 400px, (max-width: 1000px) 800px, 1200px"
  alt="SEO image optimization guide"
  width="800"
  height="600"
  loading="lazy"
/>
The ALT attribute and filename: Semantic SEO
Google's image crawler (Googlebot Images) cannot "see" images like humans. It relies on textual context.
The ALT attribute: Descriptive and specific
Good examples:
alt="SEO image optimization guide 2025 - WebP and AVIF formats"Bad examples:
alt="image"
alt="photo1"
alt=""  (empty)
SEO formula: Main keyword + descriptive context (5-12 words)
Filename with keywords
Good:
optimize-images-seo-guide-2025.webpBad:
IMG_4523.jpg
photo-final-final-2.png
Tip: Use hyphens (-), avoid spaces and special characters. Keep it between 3-7 words.
Official tools to measure performance
1. Google PageSpeed Insights
URL: https://pagespeed.web.dev
What it measures:
- LCP, FID/INP, CLS (Core Web Vitals)
- Specific image recommendations
- Mobile and desktop score (0-100)
How to interpret:
- 90-100: Excellent
- 50-89: Needs improvement
- 0-49: Poor (urgent action)
2. Chrome DevTools Lighthouse
How to access: F12 → Lighthouse tab → Generate report
Advantage: Tests local version before deploying.
3. Google Search Console (Core Web Vitals)
URL: search.google.com/search-console
What it shows:
- Real performance from actual users
- URLs with problems
- Evolution over 28 days
Critical: PageSpeed Insights shows lab data (simulations). Search Console shows real field data (real users).
4. Lighthouse CI
Automate audits in your CI/CD workflow:
npm install -g @lhci/cli
lhci autorun --collect.url=https://your-web.com
Advanced optimization techniques
1. Native lazy loading
Since Chrome 76, native lazy loading exists:
<img src="image.webp" loading="lazy" alt="..."/>Important: NEVER use loading="lazy" on the LCP image (hero). This delays loading and destroys your score.
2. Preload critical image
For the hero image (LCP), use preload with high priority:
<link rel="preload"
      as="image"
      href="/hero.webp"
      type="image/webp"
      fetchpriority="high"/>
3. Image CDN
Specialized CDNs (Cloudflare Images, Cloudinary, Imgix) offer:
- Automatic compression
- Format conversion based on browser
- Dynamic resizing with query params
- Global distribution (reduces latency)
Cloudflare Images example:
<img src="https://imagedelivery.net/your-account/image/public"/>4. Remove EXIF metadata
Camera photos include EXIF metadata (GPS location, camera model, settings) that can add 50-100 KB unnecessarily.
Tools:
exiftool(command line)- ImageOptim (Mac)
- Squoosh.app (web, by Google)
Professional workflow (Step by step)
To ensure every image you upload adds and doesn't subtract, get used to this process:
Step 1: Prepare original image
- Dimensions: Export to exact size needed (maximum 1920px width for hero)
- Original format: PNG if it has transparency, JPEG if it's a photograph
- Remove unnecessary EXIF metadata
Step 2: Convert to modern format
- Convert your images to WebP with 85% quality using FormatVault (100% local processing in your browser). If you need to prepare professional documents, you can also put your ID card on one PDF page with our sister tool DoctVault
- Optional: Generate AVIF version for compatible browsers
- Keep JPEG/PNG version as fallback for full compatibility
Step 3: Rename with keywords
original-image.jpg→seo-image-optimization-guide-2025.webp- Use hyphens, avoid spaces and accents
- Maximum 5-7 words
Step 4: Upload with optimized HTML
<picture>
  <source type="image/avif" srcset="image.avif"/>
  <source type="image/webp" srcset="image.webp"/>
  <img src="image.jpg"
       alt="Ultimate SEO image optimization guide 2025"
       width="800"
       height="600"
       loading="lazy"/>
</picture>
Step 5: Verify with audits
- PageSpeed Insights: Target 90+ on mobile
- Chrome DevTools: LCP < 2.5s, CLS < 0.1
- Google Search Console: Monitor "Core Web Vitals" for 28 days
Common mistakes that destroy your SEO
❌ Error 1: Not specifying width and height
Problem: Causes CLS (content jumps when image loads)
Solution:
<img src="image.webp" width="800" height="600" alt="..."/>❌ Error 2: Using loading="lazy" on hero image
Problem: Delays LCP loading, destroys score
Solution: Hero image WITHOUT lazy, rest WITH lazy
❌ Error 3: Empty or generic ALT
Problem:
alt=""
alt="image"
alt="photo1"
Solution: Descriptive ALT with keywords
❌ Error 4: Uploading camera photos without processing
Problem: 4000x3000 images (4 MB) to display at 800px
Solution: Resize BEFORE uploading
FAQ: Frequently asked questions
Does compressing to 85% quality affect professional photography?
No. Photographers like Chase Jarvis and studio Unsplash use 85-90% compression for web. Quality loss is imperceptible on screens. Keep RAW/TIFF original for prints.
Is WebP compatible with all browsers?
97% browsers (Chrome, Firefox, Edge, Safari 14+). For 100%, use <picture> with JPEG fallback.
Can I use AVIF in production?
Yes, with WebP fallback. Chrome 85+, Firefox 93+, Safari 16+ support AVIF. Always test on real devices.
How often should I audit my images?
Quarterly minimum. Google updates algorithms. Monitor Core Web Vitals monthly in Search Console.
Technical breakdown of LCP: Optimize each subpart
According to web.dev/articles/optimize-lcp, LCP breaks down into 4 subparts:
LCP breakdown
- TTFB (Time to First Byte): Server response time
- Resource load delay: Time from HTML to image request
- Resource load duration: Actual image download time
- Element render delay: Browser processing time
Optimization by subpart
1. Optimize TTFB (<800ms):
- Use CDN (Cloudflare, Fastly)
- Enable HTTP/2 or HTTP/3
- Cache server-side responses
2. Reduce Resource Delay:
<link rel="preload" fetchpriority="high">for LCP image- Eliminate render-blocking CSS above LCP
3. Reduce Load Duration:
- Convert to WebP/AVIF
- Compress to 85% quality
- Use CDN for global distribution
4. Reduce Render Delay:
- Specify
widthandheight - Avoid large JavaScript above-the-fold
Optimal LCP distribution according to Google
According to CrUX data from millions of websites:
| Subpart | Optimal % | Average web % |
|---|---|---|
| TTFB | ~40% | 45-55% ⚠️ |
| Resource Delay | <10% | 15-25% ⚠️ |
| Resource Duration | ~40% | 30-40% |
| Render Delay | <10% | 5-15% |
Conclusion: Most sites have huge improvement margin in TTFB and Resource Delay. Implementing fetchpriority="high" can reduce your LCP by 500-1000ms instantly.
Real case study: From 4.2s to 1.8s LCP
Site: Photography blog with heavy galleries
Before: LCP 4.2 seconds (red zone)
After: LCP 1.8 seconds (green zone)
Implemented changes:
1. Massive WebP conversion
- 150 images converted
- Average weight: from 1.2 MB to 380 KB (-68%)
- Time: 2 hours using local batch conversion
2. Fetchpriority implementation
<!-- Before -->
<img src="hero.jpg" alt="..."/>

<!-- After -->
<link rel="preload" as="image" href="hero.webp" fetchpriority="high"/>
<img src="hero.webp" alt="..." width="1920" height="1080"/>
3. Strategic lazy loading
- Hero: WITHOUT lazy loading
- Gallery: WITH
loading="lazy"after first viewport
4. Cloudflare Images CDN
- Latency reduced from 200ms to 45ms (Europe users)
- Automatic format conversion based on browser
Result:
- LCP: 4.2s → 1.8s (-57%)
- CLS: 0.24 → 0.05 (-79%)
- Organic traffic: +127% in 3 months
- Bounce rate: 68% → 42%
ROI: The 2-hour optimization investment generated 2,400 additional monthly visits from Google.
Final checklist: 15 verification points
Before publishing, verify:
- ✅ All images are in WebP or AVIF
- ✅ Compression quality 80-85%
- ✅ Exact dimensions to display size
- ✅
widthandheightattributes present - ✅ Descriptive ALT text on all images
- ✅ Filenames with keywords
- ✅ Hero image (LCP) uses
fetchpriority="high" - ✅ Below-the-fold images use
loading="lazy" - ✅ EXIF metadata removed
- ✅ LCP < 2.5 seconds in PageSpeed Insights
- ✅ CLS < 0.1 (no content jumps)
- ✅ Total page weight < 2 MB
- ✅ Gzip/Brotli compression enabled on server
- ✅ CDN configured (optional but recommended)
- ✅ Monitoring Core Web Vitals in Search Console
Conclusion: Optimization is continuous
Image optimization is not a one-time task. It's a continuous process that requires:
- Monthly monitoring of Core Web Vitals in Google Search Console
- Quarterly audits with PageSpeed Insights
- Updates when new formats emerge (the post-AVIF future)
Following this guide with official Google data, you'll be ahead of 95% of websites that neglect this fundamental aspect of technical SEO.
Your next step: Convert your first image to WebP with FormatVault and measure the impact in PageSpeed Insights. You'll see immediate improvements of 10-30 points in your performance score. If you want more advanced techniques, read our guide on reducing image weight without losing quality.
Official sources:
- web.dev/articles/lcp (Google)
- web.dev/articles/optimize-lcp (Google)
- developers.google.com/search/docs/appearance/google-images (Google Search Central)
- chromium.googlesource.com/chromium/src/+/main/docs/speed/metrics_changelog/ (Chromium)
Was this article helpful?
Share it and help more people optimize their images
Related Articles
WebP vs AVIF vs JPEG: Complete Technical Format Analysis
Definitive technical comparison with official Google data.
How Images Affect Core Web Vitals
Core Web Vitals are an official ranking factor since May 2021.

Reduce Image Weight by 80% Without Losing Quality
A 500KB image can become 100KB with no visible difference.